Author
 Simon Knibbs
Simon has been working at EPLAN UK for 3 years as an EPLAN Applications Engineer. He started his career in building, services, and moved on to designing and programming early robotics. He then became involved in mechatronic design and PCB layout. Since joining the CAD industry he has always been at the forefront assisting customers. He is a great advocate of value for money and hates to see customers’ investments underutilised through lack of knowledge, configuration skills or investment. He is a firm believer that a consultant’s role is to aid the customer in doing things better, easier and faster. So automation, standardisation and integration into other workflows are his interests.
Knibbs.S@eplan.co.uk
Simon Knibbs auf LinkedIn
Simon Knibbs
Simon has been working at EPLAN UK for 3 years as an EPLAN Applications Engineer. He started his career in building, services, and moved on to designing and programming early robotics. He then became involved in mechatronic design and PCB layout. Since joining the CAD industry he has always been at the forefront assisting customers. He is a great advocate of value for money and hates to see customers’ investments underutilised through lack of knowledge, configuration skills or investment. He is a firm believer that a consultant’s role is to aid the customer in doing things better, easier and faster. So automation, standardisation and integration into other workflows are his interests.
Knibbs.S@eplan.co.uk
Simon Knibbs auf LinkedIn
EPLAN Parts Management
In the article on inserting symbols, we learned to insert general symbols for circuit breakers and others, as well as devices into the schemes – specific products of specific manufacturers, which then form a bill of materials and from which we will produce our devices. But where do you get these devices?
Firstly, it’s necessary to clarify two things – what are these devices and where are they stored? This is the last paragraph where we will use the term ‘device.’ In EPLAN terminology, the device is already an instance in the project. The data that defines what to buy (type number, order number, descriptions, technical information) are called items. So when I want to use a new circuit breaker, for example, I must first create an item of this circuit breaker, and only then should I insert it into the project representing the device.
They are then stored in the ‘parts database.’ There is no need to be afraid of the concept of a database, although an external SQL database can also be used, EPLAN can create its own internal database. For a quick start, the database is created and set up immediately after installation, so we can start creating new items right away.
EPLAN Data Portal
The easiest way to get the items is to download them. The EPLAN Data Portal, a cloud-based database of parts, is integrated directly into the EPLAN environment. It currently contains almost one and a half million items from more than 430 manufacturers around the world.
The EPLAN Data Portal, as well as other cloud applications, can be found in the EPLAN Cloud tab:

If you are not yet registered, you can do so here:
After opening the EPLAN Data Portal, you will see the ‘list of parts’ tab with the most downloaded parts. On the left, you can start browsing filters by manufacturers, and browse the catalogue of all items or filters, for example, only items with 3D macro, etc. However, the search itself is quite complicated in such a large database, so it is better to select the component in advance and use the full-text search on the Data Portal to find the best match.
|
TIP: EPLAN Data Standard fields can be activated between filters. This is a certification of parts, ensuring that they are created according to EPLAN rules, have filled in the required data in the given format and are of the highest quality. |
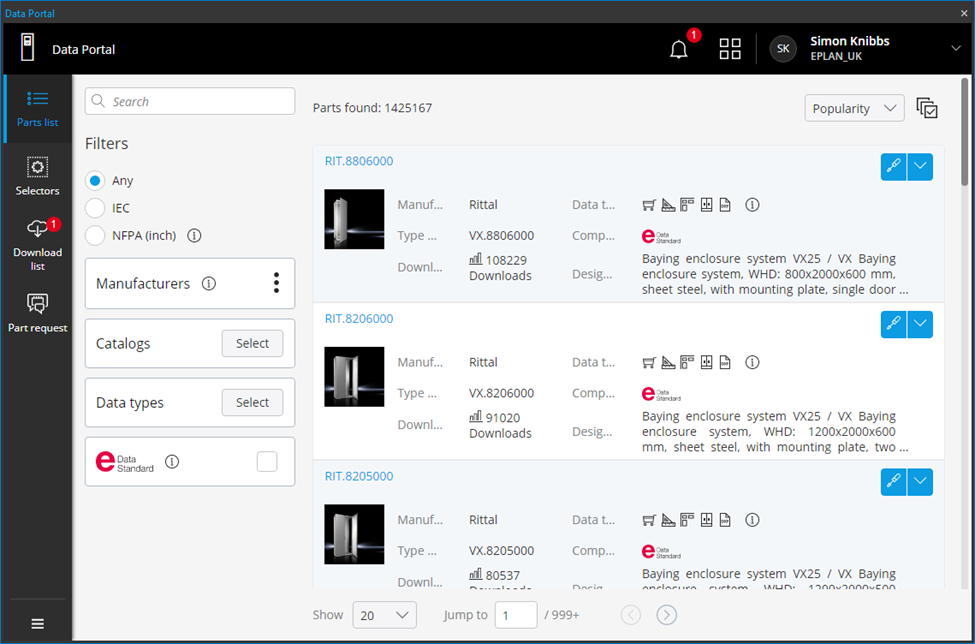
After finding a part, the types of data are also visible in detail (in addition to business information confirming that it is indeed the item we were looking for.) They tell us what the item contains when we download it.

The type of data needed cannot be generalised, but for simplicity:
- Commercial data – type number information, description, etc. They will always be filled in.
- Function templates – define from which symbols the device will be drawn in the diagram. That's why we want to have them filled in for everything that is placed in the schemes.
- Logic macro – more complex devices that cannot be drawn with a standard symbol, such as PLCs, converters, power supplies etc.
Other items then depend on whether we will process the design of the switchboard in 2D or 3D, and what production materials we will generate.
After finding the required item, we can download it and import it into the database. This is really a two-step procedure where we first download the item: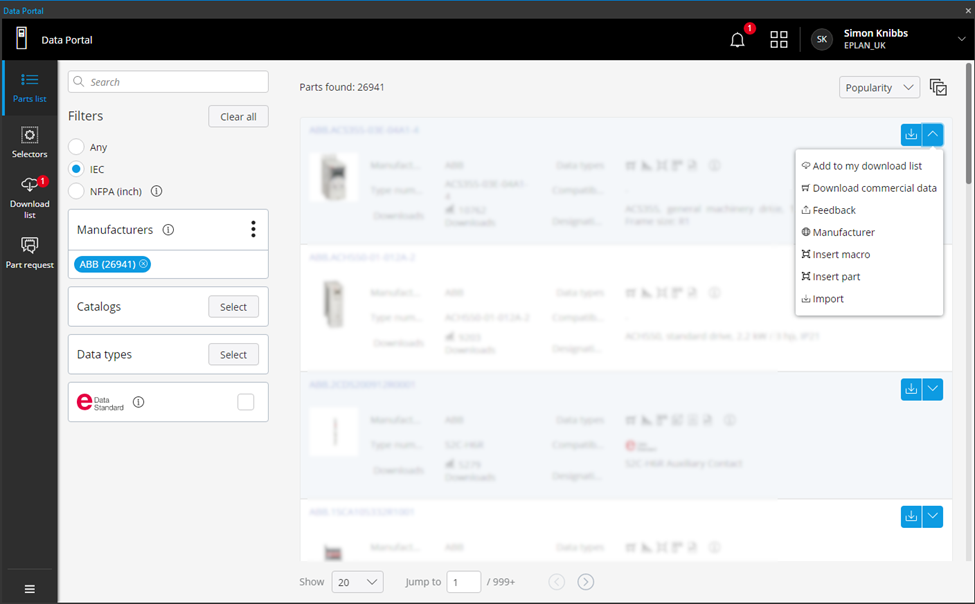
The following is a summary of what will be downloaded, where we can choose whether to update existing items, download only new ones, or both, and then confirm ‘OK’: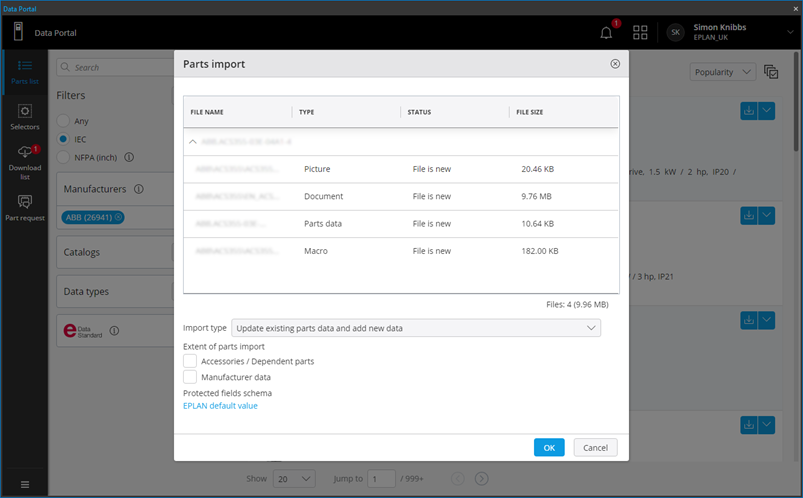
And finally, we import into the database:
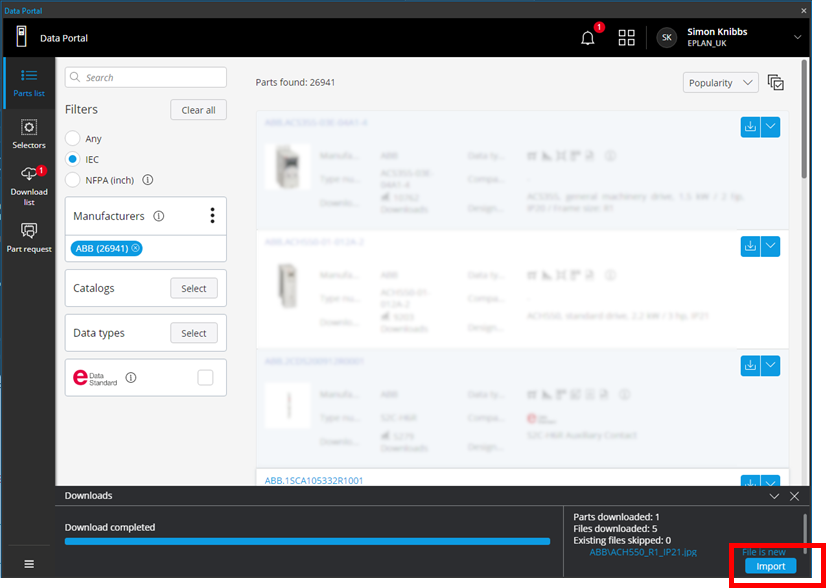
Now the item is ready in the database and we can select it in the insert center and insert it into the project.
More about the EPLAN Data Portal can be found in the help section.
| TIP: For easier searching directly from the website, you can also use the Google Chrome extension, which searches on the EPLAN Data Portal and prepares the found items for download to the download list. |
Custom Items
Not everything can be found on the EPLAN Data Portal, for example a product from a local supplier or a special component. Instead, simply create such items yourself in the Item Manager.
Here you can select the correct category in the left part (if it is not created yet, it can be changed later) and select ‘New’ from the context menu, or copy/paste a similar item, and edit the data to match the new item.
Then, on the ‘properties’ tab, fill in the required data - not forgetting about the function templates – they decide what symbols will be inserted into the schemes.
If you want to learn more about creating items and master data, check out our range of advanced training.



Comments